C GUI Calculator
A GUI-based calculator developed in C using GTK.
Project maintained by rafisarkar0128 Hosted on GitHub Pages — Theme by mattgraham
💡 Getting Started – C GUI Calculator
Welcome! This comprehensive guide will help you get up and running with the C GUI Calculator built using GTK+ 3. Whether you’re a beginner or experienced developer, this guide provides detailed platform-specific instructions to clone, install dependencies, compile, and run the calculator successfully.
🎯 What You’ll Learn
By following this guide, you will:
- Set up a complete C development environment with GTK+ 3
- Understand the compilation process for GUI applications in C
- Learn platform-specific considerations and best practices
- Troubleshoot common installation and compilation issues
- Troubleshoot common installation and compilation issues
📦 Prerequisites & System Requirements
Essential Components
Before compiling, ensure the following packages are installed on your system:
| Component | Purpose | Linux Package | Windows (MSYS2) | macOS (Homebrew) |
|---|---|---|---|---|
gcc |
C compiler for building the application | gcc |
mingw-w64-x86_64-gcc |
gcc |
pkg-config |
Manages compiler/linker flags for libraries | pkg-config |
mingw-w64-x86_64-pkg-config |
pkg-config |
libgtk-3-dev |
GTK+ 3 development files for GUI | libgtk-3-dev |
mingw-w64-x86_64-gtk3 |
gtk+3 |
System Requirements
- RAM: Minimum 2GB (4GB recommended)
- Disk Space: At least 500MB free space for development tools
- Operating System:
- Linux: Any modern distribution (Ubuntu 18.04+, Fedora 30+, etc.)
- Windows: Windows 10/11 with MSYS2
- macOS: macOS 10.14+ with Homebrew
📋 Note: See our detailed Requirements Guide for comprehensive package information and alternative installation methods.
🚀 Step-by-Step Setup & Compilation
🔹 Step 1: Clone the Repository
First, clone the project repository to your local machine:
# Clone the repository
git clone https://github.com/rafisarkar0128/c-gui-calculator.git

# Navigate to the project directory
cd c-gui-calculator

# Verify the files are present
ls -la
Expected output:
main.c              # Main source code
README.md           # Project documentation
Getting-Started.md  # This guide
Requirements.md     # Detailed requirements
LICENSE             # MIT license
.gitignore          # Git ignore rules
🔹 Step 2: Install Development Dependencies
Choose the appropriate instructions for your operating system:
📍 Linux (Debian/Ubuntu/Mint)
# Update package repository
sudo apt update && sudo apt upgrade -y

# Install essential development tools
sudo apt install build-essential

# Install GTK+ 3 development packages
sudo apt install gcc pkg-config libgtk-3-dev

# Optional: Install additional development tools
sudo apt install git vim nano

# Verify installation
gcc --version
pkg-config --modversion gtk+-3.0
Expected GTK version: 3.22 or higher
📍 Linux (Fedora/CentOS/RHEL)
# Update system packages
sudo dnf update -y

# Install development tools group
sudo dnf groupinstall "Development Tools" -y

# Install GTK+ 3 development packages
sudo dnf install gcc pkgconf-pkg-config gtk3-devel

# Verify installation
gcc --version
pkg-config --modversion gtk+-3.0
📍 Linux (Arch/Manjaro)
# Update system
sudo pacman -Syu

# Install base development packages
sudo pacman -S base-devel

# Install GTK+ 3
sudo pacman -S gtk3 pkg-config

# Verify installation
gcc --version
pkg-config --modversion gtk+-3.0
📍 macOS (Homebrew)
Prerequisites: Install Homebrew if not already installed:
/bin/bash -c "$(curl -fsSL https://raw.githubusercontent.com/Homebrew/install/HEAD/install.sh)"
Install development tools:
# Install Xcode command line tools (if not already installed)
xcode-select --install

# Install required packages
brew install gcc pkg-config gtk+3

# Install XQuartz for X11 support (required for GTK on macOS)
brew install --cask xquartz

# Verify installation
gcc --version
pkg-config --modversion gtk+-3.0
⚠️ Important for macOS users:
- GTK applications require XQuartz to run properly
- You may need to log out and back in after installing XQuartz
- Consider using
brew install gtk+3instead ofgtk3if you encounter issues
📍 Windows (MSYS2) - Recommended Method
Step 2.1: Download and install MSYS2 from msys2.org
Step 2.2: Launch MSYS2 and update the system:
# Update package database and core system packages
pacman -Syu

# Close terminal when prompted, then reopen and run:
pacman -Su
Step 2.3: Install development tools:
# Install base development tools
pacman -S base-devel

# Install MinGW-w64 toolchain and GTK+ 3
pacman -S mingw-w64-x86_64-gcc mingw-w64-x86_64-pkg-config mingw-w64-x86_64-gtk3

# Optional: Install additional useful tools
pacman -S mingw-w64-x86_64-gdb git nano vim

# Verify installation
gcc --version
pkg-config --modversion gtk+-3.0
Step 2.4: Set up environment:
# Add MinGW64 to your PATH (add to ~/.bashrc for persistence)
export PATH="/mingw64/bin:$PATH"

# Verify the environment
echo $PATH
which gcc
💡 Windows Alternative: You can also use Code::Blocks with MinGW or Visual Studio with vcpkg, but MSYS2 is recommended for its simplicity and package management.
🔹 Step 3: Verify Your Development Environment
Before compiling, let’s verify that all components are properly installed:
# Check GCC compiler
gcc --version
# Expected: gcc (GCC) 9.0 or higher

# Check pkg-config
pkg-config --version
# Expected: 0.29 or higher

# Check GTK+ 3 installation
pkg-config --modversion gtk+-3.0
# Expected: 3.22.0 or higher

# List GTK+ compile flags (should show multiple -I include paths)
pkg-config --cflags gtk+-3.0

# List GTK+ linker flags (should show multiple -l library flags)
pkg-config --libs gtk+-3.0
🔹 Step 4: Compile the Calculator
Now let’s compile the calculator application:
Basic Compilation
# Navigate to the project directory (if not already there)
cd c-gui-calculator

# Compile with basic optimization
gcc -o calculator main.c `pkg-config --cflags --libs gtk+-3.0` -lm

# Check if compilation was successful
ls -la calculator*
Advanced Compilation (Recommended for Development)
# Compile with debugging symbols and warnings
gcc -Wall -Wextra -g -o calculator main.c `pkg-config --cflags --libs gtk+-3.0` -lm

# Or with optimization for release
gcc -O2 -o calculator main.c `pkg-config --cflags --libs gtk+-3.0` -lm
Platform-Specific Compilation Notes
Linux/macOS:
gcc -o calculator main.c `pkg-config --cflags --libs gtk+-3.0` -lm
Windows (MSYS2):
# In MSYS2 MinGW64 terminal
gcc -o calculator.exe main.c `pkg-config --cflags --libs gtk+-3.0` -lm
🧠 Explanation of flags:
-lm: Links the math library (required for mathematical functions)--cflags: Includes compiler flags for GTK+ headers--libs: Includes linker flags for GTK+ libraries-Wall -Wextra: Enables additional compiler warnings-g: Includes debugging information-O2: Enables optimization level 2
🔹 Step 5: Run the Calculator
Linux/macOS:
# Run the calculator
./calculator

# If you get permission errors, make it executable first:
chmod +x calculator
./calculator
Windows (MSYS2):
# Run in MSYS2 terminal
./calculator.exe

# Or double-click the calculator.exe file in File Explorer
Expected Behavior
When successful, you should see:
- A calculator window opens with a clean, modern interface
- Number buttons (0-9), operation buttons (+, -, *, /, ^)
- Scientific function buttons (sin, cos, tan, sqrt, log, ln)
- A display showing “0” initially
- Responsive button clicks and keyboard shortcuts (Enter, Backspace)
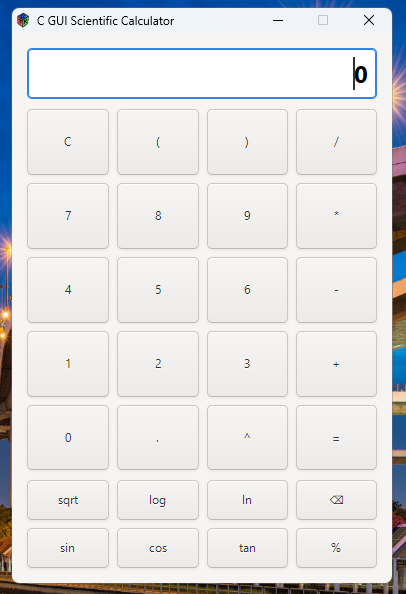
📸 If the calculator doesn’t look right or crashes, see the troubleshooting section below.
🛠️ Troubleshooting
- Ensure your system’s package manager is up to date.
- If
pkg-configreports missing paths, verify GTK installation. - Windows users: Make sure MSYS2’s shell uses the
mingw-w64environment, not the defaultmsys.
📚 Additional Resources & References
Official Documentation
- GTK+ 3 Documentation - Complete API reference and tutorials
- GCC Manual - Compiler documentation and options
- pkg-config Guide - Package configuration tool documentation
Platform-Specific Resources
- MSYS2 Documentation - Windows development environment setup
- Homebrew Documentation - macOS package manager
- Ubuntu Development Guide - Linux compilation basics
Learning Resources
- GTK+ 3 Tutorial - Official GTK+ getting started guide
- C Programming Tutorial - Interactive C programming course
- Mathematical Expression Parsing - Understanding the algorithm used in this calculator
Development Tools
- Visual Studio Code - Recommended code editor with C/C++ extensions
- GDB Debugger - For debugging C applications
- Valgrind - Memory error detection tool (Linux/macOS)
Community & Support
- Project Repository - Source code and issue tracker
- GTK Community - GTK+ development community
- Stack Overflow - Programming Q&A with GTK tag
🎉 Congratulations!
If you’ve successfully followed this guide, you now have:
- ✅ A complete C development environment with GTK+ 3
- ✅ A working scientific calculator application
- ✅ Understanding of the compilation process
- ✅ Knowledge to troubleshoot common issues
Next Steps:
- Explore the calculator’s features and test different mathematical expressions
- Read through the source code in
main.cto understand the implementation - Try modifying the code to add new features or customize the interface
- Share your experience or contribute improvements to the project
Need more help? Check our comprehensive README or create an issue on GitHub.
Happy coding! 🚀